React-dev-inspector 源码分析 ::: tip
使用方式
1 2 3 4 5 6 7 8 9 import { Inspector } from 'react-dev-inspector' const WrapComponent =env .NODE_ENV === 'development' ? Inspector : Fragment WrapComponent keys={["control" , "shift" , "alt" , "f" ]}><App /> WrapComponent >
1 2 3 4 5 6 7 module .exports = {plugins : ['react-dev-inspector/plugins/babel' ,
1 2 3 4 5 6 7 8 9 10 11 12 13 14 15 16 17 18 19 20 21 22 23 24 25 26 import type { Configuration } from 'webpack' import { launchEditorMiddleware } from 'react-dev-inspector/plugins/webpack' const config : Configuration = {devServer : {setupMiddlewares : (middlewares, devServer ) => {unshift (launchEditorMiddleware)return middlewaresbefore : (app, server, compiler ) => {use (launchEditorMiddleware)
编译时 react-dev-inspector/plugins/babel ,拿到未编译的tsx源码,遍历 AST节点,给其中的DOM节点上添加源码位置信息: line、column、relative path
1
2
3
4
5
6
7
8
9
10
11
12
13
14
15
16
17
18
19
20
21
22
23
24
25
26
27
28
29
30
31
32
33
34
35
36
37
38
39
40
41
42
43
44
import {from '@babel/types/lib/builders/generated' const doJSXOpeningElement : NodeHandler <JSXOpeningElement ,relativePath : string }(node, option ) => {const { stop } = doJSXPathName (node.name )if (stop) return { stop }const { relativePath } = optionconst line = node.loc ?.start .line const column = node.loc ?.start .column const lineAttr : JSXAttribute | null = isNil (line)null jsxAttribute (jsxIdentifier ('data-inspector-line' ),stringLiteral (line.toString ())const columnAttr : JSXAttribute | null = isNil (column)null jsxAttribute (jsxIdentifier ('data-inspector-column' ),stringLiteral (column.toString ())const relativePathAttr : JSXAttribute = jsxAttribute (jsxIdentifier ('data-inspector-relative-path' ),stringLiteral (relativePath)const attributes = [lineAttr, columnAttr, relativePathAttr] as JSXAttribute []if (attributes.every (Boolean )) {attributes .unshift (...attributes)return { result : node }
运行时 Inspector 容器组件 键盘事件监听 使用 hotkeys-js 绑定键盘事件,用来快捷键唤起元素检视或关闭检视
1 2 3 4 5 6 7 8 9 10 11 12 13 14 15 16 17 18 19 20 21 22 23 24 25 26 const defaultHotKeys = ['control' , 'shift' , 'command' , 'c' ]const keys = props.keys const hotkey = keys ? keys.join ('+' ) : defaultHotKeys.join ('+' )useEffect (() => {const handleHotKeys = (event, handler ) => {if (handler.key === hotkey) {current ? stopInspect () : startInspect ()else if (handler.key === 'esc' && overlayRef.current ) {stopInspect ()hotkeys (`${hotkey} , esc` , handleHotKeys)return () => {unbind (`${hotkey} , esc` , handleHotKeys)delete window .__REACT_DEV_INSPECTOR_TOGGLE__
mousemove 事件监听 1 2 3 4 5 6 7 8 9 10 11 12 13 const mousePointRef = useRef ({ x : 0 , y : 0 })const recordMousePoint = ({ clientX, clientY } ) => {current .x = clientXcurrent .y = clientYuseEffect (() => {document .addEventListener ('mousemove' , recordMousePoint, true )return () => {document .removeEventListener ('mousemove' , recordMousePoint, true )
startInspect 1 2 3 4 5 6 7 8 9 10 11 12 13 14 15 16 const overlayRef = useRef ()const startInspect = (const overlay = new Overlay ()current = overlayconst stopInspect = (current ?.remove ()current = null
获取悬停 dom 元素信息 根据之前监听 mousemove 事件记录的鼠标 clientX、clientY 获得鼠标悬停处最上层元素
DocumentOrShadowRoot 接口的 elementFromPoint() 方法返回给定坐标点下最上层的 element 元素。
1 2 const initPoint = mousePointRef.current const initElement = document .elementFromPoint (initPoint.x , initPoint.y )
Element.getBoundingClientRect() 方法返回一个 DOMRect 对象,其提供了元素的大小及其相对于视口的位置。
1 2 3 4 const rect = initElement.getBoundingClientRect ()const { left, top } = rect
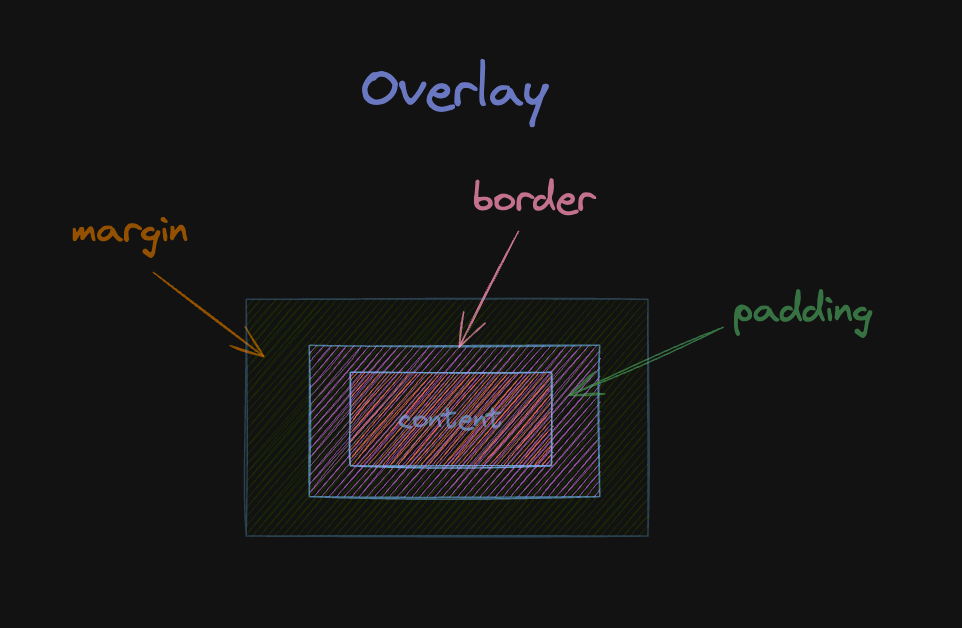
Window.getComputedStyle()方法返回一个对象,该对象在应用活动样式表并解析这些值可能包含的任何基本计算后报告元素的所有 CSS 属性的值。
1 2 3 4 5 6 7 8 9 10 11 12 13 14 15 16 17 18 export function getElementDimensions (domElement: Element ) {const calculatedStyle = window .getComputedStyle (domElement)return {borderLeft : parseInt (calculatedStyle.borderLeftWidth , 10 ),borderRight : parseInt (calculatedStyle.borderRightWidth , 10 ),borderTop : parseInt (calculatedStyle.borderTopWidth , 10 ),borderBottom : parseInt (calculatedStyle.borderBottomWidth , 10 ),marginLeft : parseInt (calculatedStyle.marginLeft , 10 ),marginRight : parseInt (calculatedStyle.marginRight , 10 ),marginTop : parseInt (calculatedStyle.marginTop , 10 ),marginBottom : parseInt (calculatedStyle.marginBottom , 10 ),paddingLeft : parseInt (calculatedStyle.paddingLeft , 10 ),paddingRight : parseInt (calculatedStyle.paddingRight , 10 ),paddingTop : parseInt (calculatedStyle.paddingTop , 10 ),paddingBottom : parseInt (calculatedStyle.paddingBottom , 10 ),
由此可以得到 dom 元素的盒模型信息
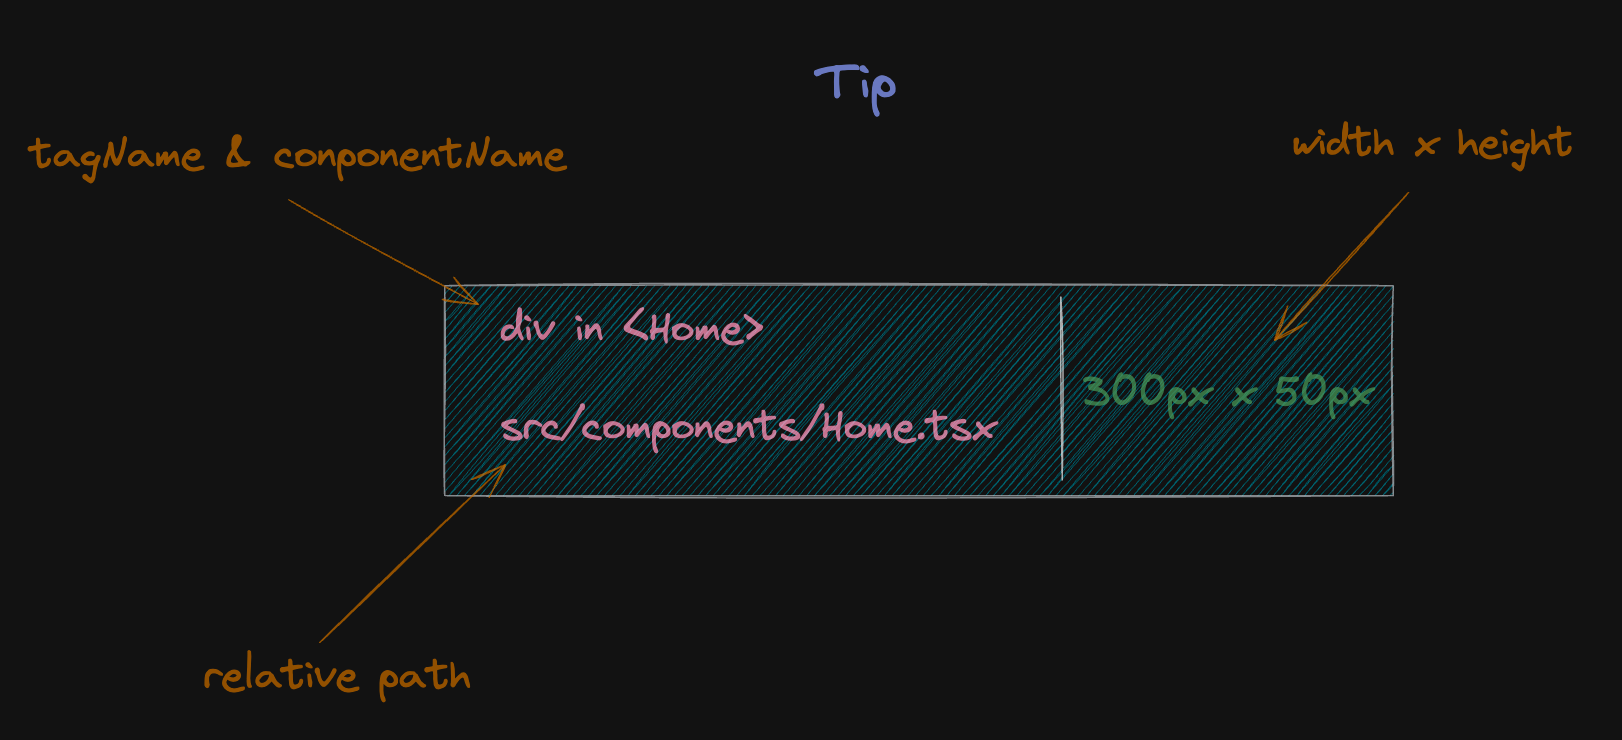
获取组件名称 React 内部会在 DOM 上反向的挂上它所对应的 fiber node 的引用
1 2 3 4 5 6 7 8 9 10 11 12 13 14 export const getElementFiber = (element : HTMLElement ): Fiber | null =>const fiberKey = Object .keys (element).find (key =>startsWith ('__reactInternalInstance$' )if (fiberKey) {return element[fiberKey] as Fiber return null
fiber 是一个链表结构,递归查找 fiber 的 return,直到查找到最近的组件节点后作为展示的名字
1 2 3 4 5 6 7 8 9 10 11 12 13 14 15 16 17 18 19 export const debugToolNameRegex =/^(.*?\.Provider|.*?\.Consumer|Anonymous|Trigger|Tooltip|_.*|[a-z].*)$/ export const getSuitableFiber = (baseFiber?: Fiber ): Fiber | null =>let fiber = baseFiberwhile (fiber) {const name = fiber.type ?.displayName ?? fiber.type ?.name if (name && !debugToolNameRegex.test (name)) {return fiberreturn return null
fiber 上的属性 type 在函数式组件的情况下对应你书写的函数,在 class 组件的情况下就对应那个类,取上面的的 displayName 或 name 属性即可
1 2 3 4 5 6 7 8 9 10 11 12 13 14 15 16 17 export const getFiberName = (fiber?: Fiber ): string | undefined =>const fiberType = getSuitableFiber (fiber)?.type let displayName : string | undefined if (typeof fiberType?.displayName === 'string' ) {displayName else if (typeof fiberType?.name === 'string' ) {name return displayName
唤醒编辑器 本地项目dev模式都是开发工具帮我们起了一个devServer,这个devServer本质上就是一个node服务,这里是利用了node服务中间件的特性,在指定的时机注入对应的中间件来实现打开编辑器的功能
源码直接使用了react-dev-utils提供的能力
Inspector组件
1 2 3 4 5 6 7 8 9 10 11 12 13 14 15 16 17 18 export const gotoEditor = source => {if (!source) return const { lineNumber, columnNumber, relativePath, absolutePath } = sourceconst isRelative = Boolean (relativePath)const launchParams = {fileName : isRelative ? relativePath : absolutePath,colNumber : columnNumber,const apiRoute = isRelative`${launchEditorEndpoint} /relative` fetch (`${apiRoute} ?${queryString.stringify(launchParams)} ` )
1 2 3 4 5 6 7 8 9 10 11 12 13 14 15 16 17 18 19 20 21 22 23 24 25 26 27 28 29 30 31 32 33 34 35 36 37 38 39 40 41 42 43 44 45 46 import path from 'path' import type { NextHandleFunction , IncomingMessage } from 'connect' import type { RequestHandler } from 'express' import createReactLaunchEditorMiddleware from 'react-dev-utils/errorOverlayMiddleware' import launchEditorEndpoint from 'react-dev-utils/launchEditorEndpoint' const reactLaunchEditorMiddleware : RequestHandler =createReactLaunchEditorMiddleware ()export const queryParserMiddleware : NextHandleFunction = ( req: IncomingMessage & { query?: Object }, res, next if (!req.query && req.url ) {const url = new URL (req.url , 'https://placeholder.domain' )query = Object .fromEntries (url.searchParams .entries ())next ()export const launchEditorMiddleware : RequestHandler = (req, res, next ) => {if (req.url .startsWith (launchEditorEndpoint)) {if (url .startsWith (`${launchEditorEndpoint} /relative` ) &&typeof req.query .fileName === 'string' query .fileName = path.join (process.cwd (), req.query .fileName )reactLaunchEditorMiddleware (req, res, next)else {next ()export const createLaunchEditorMiddleware : () => RequestHandler = () =>
一些小细节 使用pointerover替代mousemove事件来触发更新回调 pointerover 和 mousemove 事件都是鼠标移动相关的事件,但它们有以下区别:
触发方式不同:mousemove 事件在鼠标在元素内移动时连续触发,而 pointerover 事件在鼠标进入元素时才会触发一次。
支持的设备不同:mousemove 事件只支持鼠标设备,而 pointerover 事件支持多种设备,包括鼠标、触摸屏、手写笔等。
事件对象不同:mousemove 事件的事件对象是 MouseEvent,而 pointerover 事件的事件对象是 PointerEvent,它包含了更多关于指针设备的信息。
使用场景:
mousemove 事件通常用于实现一些鼠标交互效果,例如拖拽、画图等。它也可以用于实现一些特殊的效果,例如鼠标悬浮在某个元素上时改变该元素的背景色或边框样式。pointerover 事件也可以用于实现一些交互效果,例如在鼠标移动到某个元素上时显示一个弹出框或悬浮菜单等
如何确定用户使用的编辑器 巧妙实现各平台/编辑器的兼容
1 2 3 4 5 6 7 const COMMON_EDITORS_OSX = {'/Applications/Visual Studio Code.app/Contents/MacOS/Electron' : 'code' ,'/Applications/Visual Studio Code - Insiders.app/Contents/MacOS/Electron' :'code-insiders' ,
设计上提供更高的自由度 开发者可以轻松的“侵入”到插件内部来拓展或是自定义额外的功能
checkout TS definition under react-dev-inspector/es/Inspector.d.ts
1
2
3
4
5
6
7
8
9
const handleHoverElement = (element: HTMLElement ) => {
1
2
3
4
5
6
7
8
9
10
const handleClickElement = (element: HTMLElement ) => {if (!disableLaunchEditor) gotoEditor (codeInfo)
相关链接 🔗 react-dev-inspector 源码
在线示例